Wednesday, November 28, 2012

Roselle Tea

I know I've mentioned roselle tea here a few times over the last year or so. It's truly one of my favorite things. You may have heard it called hibiscus tea. You may have had a taste of it in the tea "Red Zinger"
 
I'm still harvesting fistfuls of roselle from my single plant but the frosts are beginning and I'm not a happy camper. I wish that I knew more about canning and could assure myself that storing a syrup into the summer would be O.K. But I'm only a novice to the canning scene - and a real wannabe at that. I've only really made freezer jams and butters. I just don't trust myself to store something in my cupboard for months on end. Part of that is our conditions here. It's hot and it's humid and that my friends is a recipe for disaster. Don't get me wrong. I do make my own syrups and things. It's just that my family uses them up within a week or 2 and I've never been able to make a large enough amount to have to worry about canning/jarring and preserving for the long term storage.
 
To get to the point? Right now I am wishing that I had the knowledge base that would allow me to do so. I'd love to put a bottle of this away for later. The roselle does not bloom until fall and only for 2-3 months until the first freeze. Next year I intend to have more plants - but I intended that this year as well.
 
Here is how I make my roselle tea:

Gather roselle (This can be bought online or fresh in a whole food market as well)


If you are making the tea fresh slice in half and remove the seed cavity - if you want to make a syrup leave the calyx whole (the seed cavity has loads of pectin and looks just like mini okra) If you have purchase your roselle this also give you the opportunity to inspect the roselle for any insect damage or any rotting parts that might be unseen otherwise.

 Place the pitted roselle in a pot with enough water to cover them on the stove and bring to a rapid boil. Boil for 10 minutes. Remove from burner and steep for an additional 20 minutes, up to overnight to bring out the full flavor of the roselle.


At this point the roselle has a very jelly like consistency. Strain the calyx out of the water and squeeze though a sieve or cheesecloth. Be forewarned! The roselle is also used for food coloring in other countries. If you use cheesecloth you WILL have a beautifully died red/hot pink cloth! I often use coffee filters but they rip easily. (You really should squeeze them to get the best flavor) If you have a jelly strainer this is perfect!
Because I make this so often I am comfortable adding my sugar without tasting it. I like to add it while the roselle steeps. This allows the sugar to melt completely away without stirring and becomes a part of the flavoring itself. Much like a light simple syrup. If you have never had the tea before I suggest waiting until it has cooled and you are making a glass to add the sugar to get an idea of what you will enjoy. I don't like much sugar personally.
 
Once it is strained you can add an accompaniment. My kids enjoy adding citrus to their tea. Actually they think the best way to drink it is to drink 1/2 roselle tea and 1/2 lemonade kind of an 'Roselle Palmer' I suppose. LOL.
 
This may look like a lemon, but it's not it's a Key Lime from my little tree. I enjoy a splash of lime with mine the most. But, I do also enjoy it in regular tea, with pomegranate, strawberry, lemon, a dash of honey. I don't think there is a combination I have found yet that I dislike!
 
I do have to say if you like an iced tea make sure it is thoroughly iced! Don't try to drink it luke warm first. This does not have a leafy green tea taste. If you want to impart that taste you can brew it the same way and add a couple of bags of your favorite tea as it is steeping. Otherwise if you have a roselle hibiscus plant, you can steep a few of the hibiscus leaves with the calyx. The leaves are just as good for you as the rest and will give the tea flavor that one would normally associate with a green or black tea in the background of that fruity, tangy flavor of the roselle.
 
So, while I am mourning the impending loss of this drink I am still enjoying it while I can. It's an incredibly healthy drink. Good for your liver, kidneys, lowers cholesterol - all kinds of good things. If you end up with too many of the calyx you can try chopping them and adding a tangy bite to your salads, too.
 
Drink up!
 
See you soon!
 
Barbie~


Tuesday, November 27, 2012

Thankful trip

Now that was a wild trip!

We went to Alabama for 8 days. Maybe it was 9 days... I'm losing track now. We did a lot of work. Got the tables set up that we made out of the old metal pallets. (I forgot to take pictures, AGAIN- but I had good reasons, I promise!) Took down a third of the old barn. Reinforced a third of it and the largest and most dangerous part we will work on during the next trip. Over Christmas. We will travel back for the largest trip of the year. We always try to spend another 10 days during that time but this year we will spend a full 2 weeks. There is much to be done.

This trip was wonderful The weather was very cooperative. It sprinkled all day off and on once and it was cool but comfortable every. single. day. That is just weird. Usually we roast in the afternoon, freeze at night roast again, etc. But this trip was perfect. 

Until we got home. But that is a story I'll save for in a few minutes. The first night there we saw some of our herd of deer and knew that all was well. All of our hard work during the summer is paying off and it IS worth the trouble to both keep the deer on the land and keep them OUT of the crops. Some times it seems like an epic battle of mending fences and rethinking ourselves and our plans. Wanting to give up and either go for the crops or the deer. Both are easy enough but together it's hard to do both. Not to mention the pigs (wild) on the land that need to be controlled.

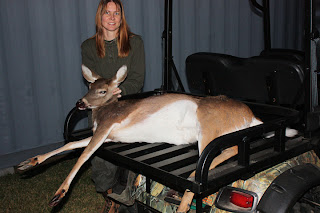
This year something is different than most years and I think it's due to the weather, but I'm no expert. The rut (mating season) has started much earlier than in previous years. Most years the dear don't begin until late December and into January. Not this year! The deer are already showing signs of rutting. Thanksgiving night I harvested a doe to find out she was in full estrus! The mating season really did change this year. How strange. The next night I had a buck stalking the area where the doe was at. He was a prime buck, and he was left to carry on his genes. A younger buck that was developing split tines was taken for our freezer.

(Time for a whine. Tune out now if you don't want to hear it or see pictures of dead deer.)
I'll save the pictures for last. Because now I'll tell you what was not so perfect about this trip. We came home after a week of working and harvesting to find our house looking in roughly the same shape it appeared in when we left. We unpacked the few things we bring back and forth. When it came time to take showers that night we flipped on the heater.... Uh... well - we TRIED to flip on the heater. It didn't work. We have two so we went downstairs to flip on that heater instead... it wasn't working either. :-( Oh no! Bad timing! I have a space heater I use occasionally so I pulled that out and put it in the bathroom, warmed it up a bit, got the kids ready started drawing a bath and the water ran and ran and ran. But, it never turned warm. That's odd. I washed my hands and the water was warm, so I went to the sink. Sure enough the water is warm there. I turned the water in the tub all the way to hot and.... dribble dribble dribble.... DOH! NOTHING! So I went to the next bathroom, same thing! OMG I feel like we've been sabotaged! At least we have one shower that is working. But - Grrr....

Our DRYER is out, too. So now we have clothes that desperately need washed, no way to dry them we are all taking turns in 1 shower using the hot water heater that already wasn't working right....

WAHHHH!!!!! Oh, and to top it off something had a try at my poor Dusty. When I got home and checked on her she had a bald spot and small cut on her throat with LOTS of feathers missing there. It looks like an animal tried to grab her by the throat. I hope she sliced it open with her claws!

OKOK, It isn't THAT bad. I have space heater for the bedroom so we are not freezing at night. I do have at least one operating bath tub. But, it feels pretty awful. LOL. It felt worse that night as we were finding everything of course. Now that I've had a day to realize the world is not ending and I can actually operate this way (Once I get my clothes clean) I'm feeling a lot better. But what a rough way to come back to the house, huh?

Promised dead deer pictures - here is what we are so thankful will be filling our freezer and our bellies this year:

Pictures of the buck will be forthcoming. Because it is the first buck I harvested my husband feels the need to put it on the wall. What exactly is it with men and hanging animal heads on a wall? BLECH! Why not just mount the antlers? Oh well. I could not convince him otherwise, so I'll show you the photo of him all prettied up when we pick him up from the taxidermist. My girls want to get in the picture, too.

So tally this trip 150 pounds of meat $3 a pound = $450 ++(Venison in stores and on menus runs much more but I would never pay for it!) ( minus - A/C bill & plummer yet to be determined. LOL)
We give  30-50+ pounds a meat per trip to my brother who is on social security and has no other income. It helps with his income then at the end of the year depending on what meat is left in the freezer we will divy it all up and give him more. This year looks plentiful so we will have more to give and we are thankful for that.

See you soon!

Barbie~

Thursday, November 8, 2012

A new feeder!

Ah, I told you I would eventually show you how I made the feeder.
I'm finally back to show ya. :-D

This is the feeder that I had for my 3 wonderful little girls.
As a feeder it was well... it held the food. Until they flicked it out onto the ground that is. The sides of the feeder that hold the food are not high because it's designed for feeding chicks. It only held a 2 day supply of food. 3 days at most and I don't know at what point on day 3 they would run out. Probably fairly early in the day as they tend to wake up hungry.

It served us well for a few months. I raised it up above their backs to help with keeping them from flicking as much onto the ground. But, still it was a pain to fill and it needed filled a lot. In addition I knew that as the winter months approached I would see less of my flock during daylight hours so filling the feeder during the week would become excessively difficult. I could have gotten another feeder identical to this one and had enough food for the week probably, but the feeder costs around $19. Seemed to me that I could come up with something better than that for the price!

Knowing that we travel a lot to Alabama for extended weekends, and in the winter for weeks at a time I also knew we needed a LARGE capacity feeder that I wouldn't have to worry about getting jammed up. Something that the chickens themselves would be able to keep the food flowing.
I started looking around and lucky for me we have an abundance of 5 gallon buckets around here.
So, I started looking around a little and found a few designs I liked and then modified them to what I needed. I needed something that was more or less one sided, so I could put it into a corner or at least against the protected underside of their coop. Dryness is a definite factor in keeping the food safe for them to eat (fungus/mildew) and to keep the food flowing freely as well.

So, I took the 5 gallon bucket and I used the hole saw...
OK I tried to use a spade bit first. It did NOT go well. Don't do what I did. Get the hole saw out. It works better. trust me. Don't hurt yourself or others. Drill hole where you want them. Most people drill 4-6 holes uniformly around the bucket. But as I said I want the girls to eat mainly from one side.

Does a round bucket have sides?
Ah, yes here we have the3 holes I drilled, and I stuck some tape over the hole of a very tall funnel. The picture is deceiving. It looks open and small. It isn't. Anyway the funnel helps ensure that the feed in the back isn't getting stuck there. I'll probably look for an even larger funnel int he future but again, the bucket was in my garage as was the funnel.


photo compliments of TSC.
From here I did have to look around a bit for a pan to put under the bucket to catch the feed. I had one that would have worked just fine, but may have allowed the girls to bill their feed out similarly to the first feeder. Well- that would be a waste of effort so I decided it was worth my effort to go to the Tractor Supply store near me for this:

Big spender that I am you know I didn't want to spend $20 on a prefab feeder and I wasn't spending $20 on an oil pan. This seemed to be the perfect solution! $4.29 later and I was back in business. OK I admit it I tried the shallower dish first. I almost had a completely free feeder. It would have worked, but I REALLY wanted something that they were not flinging the food out of. It just  really disturbs me when they waste their food. I admit it. I am cheap!

Anyway. At this point I put it all back together and here is what I got.

BEAUTIFUL. Oh, no. Not beautiful, but it works beautifully. I don't actually snap the lid on each time. It just rests on top and I have a little 1/2 brick that stays on it instead. It works perfectly to keep the critters out and since the whole thing is kept under the coop they can't perch on it anyway.

It's super easy to fill, and the capacity is more than enough for our little flock for a week. I'm still extremely concerned leaving them for so long. 1 week makes me worry, but 2 weeks makes me SO concerned! I just know that NO ONE can love them like I do.

But, at least I know that they will have plenty of fresh food and water while I'm gone.

This feeder can be modified for any kind of critter. Dog, cat, rabbit, well - maybe not a turtle but most land animals anyway!

Just be sure that your bucket is clean (VERY important) and that your top is secure, or can be secured if needed.  Food left out is an attractant to other critters.

If you've built one or are thinking about building one for your chickens also remember to raise it up. Mine sits on some blocks. The feeder should rest at about the height of the animals backs to help contain any messes that they make. Ergonomically this makes sense, too. Less pain in the neck. ;-)  The feeder can even be hung if you attach the bucket to the pan with a nut and bolt first. This would help keep rodents from getting into the feeder and keep the mess down as well. I simply don't have a place to hang mine.

Told you I've been busy. It seems like every weekend our projects are over the top. This week we made tables out of old pallets. That won't make it on the blog because our hands were full working full time together and no one thought to take a picture. Too bad, too they came out good. Did I mention the pallets were METAL!?

See ya soon!

Barbie~


Wednesday, November 7, 2012

A little something.

My little hens. They are such good girls. Their pen always seemed to be in need of something.  It kind of echoed in there. What with a 6' fence on one side, and the wall of the house on the other. I suppose it just didn't leave much to help absorb some of the sound.

It also looked rather... Uh, well - boring and bland.
Chickens have a tendency to destroy any grasses that they come into contact with. It is there scratching insect as they search for things to hunt and peck at that destroys the roots of the plants.

I also felt that they needed some more places to get shade. Florida isn't known as the 'Sunshine State" for nothing. Even on our rainy days it's usually sunny and hot at least during the warmest (noon-3) time of the day. Combining the sun with our extreme humidity and it's cause for concern if critters don't have a place to rest away from the intense heat.

About a month ago I switched the side of the pen that the girls used to enter, and gave them a new roof. The roof is no longer tin and so it stays a little cooler in the summer and is not as loud when it's raining either. As a result the trio are happier to hang out under the coop in inclement weather.

To give them more shade I decided to mount a piece of lattice from last years garden along the fence and support it on the far side with 2x4's. I also planted 3 strawberry guava shrubs in the run that are happy to finally be out of their pots.
I think the hens are happier now. I know I am. It looks nicer, and feels better in there. Not like the stark and completely barren pen that it was.


I also changed out their feeder giving them a much larger feeder. Now that daylight savings time has ended I'm simply not able to get out to them in the evenings any more. So filling a feeder each night is impossible. I needed something that could hold enough food for the week (or longer!) Besides, I also needed to know that if the pet sitter didn't make it for a day or two (teenager after all) that my flock would be OK physically.

So now they have something that I find much more pleasing to look at and I'm not embarrassed to show people. They have a feeder that doesn't need tended to every day, and they have 2 water sources that should also last a week if necessary.

Thankfully I can go out to the run each night and make sure that they have food and water, but actually changing and filling them in the dark is not fun. So having the ability to simply top off the water buckets and rinse them on the weekends is so much better for us. Because they are taller and the hens have to step up to use the water it eliminates all the gunk that gets into most waterers as well.

I'll post soon about how I made this feeder for only $4. I probably could have gotten by even cheaper if I'd looked around the garage or the barn. Perhaps if could have been free!


Be back soon!

Barbie~


Tuesday, November 6, 2012

Commissioning

This past weekend I was able to witness the commissioning of the Coast Guard Cutter the William Flores.


It was a beautiful ceremony. The vessel itself is magnificent. The men are pretty cute, too.

Oh, yeah not supposed to be looking at that. Most of them are half my age.  *Ahem*
What? I can't help that I have eyes.

Anyway the William Flores is a Fast Response Cutter and will be an integral part of the USCG's fleet in Miami. It will patrol the waters there along the international border between the U.S. and Cuba to protect and serve. Drug runners, beware!

This was truly a once in a lifetime opportunity. Not only were we able to be present for the commisioning but we were able to meet the Mayor of Tampa and Clearwater. The Admiral of the USCG, the Governor of Florida and the individuals that were a part of the original fleet of the USCG cutter Blackthorn, a cutter that sank in Tampa Bay in 1980.

William 'Billy' Flores was a young Seaman Apprentice at the time and he lost his life saving others during the loss of the ship. For giving his life to save others this vessel will forever bear his name.

We were very fortunate to have been able to crawl into the belly of this boat. We got to see every detail of it. All of the wiring, the engines, the gally, the bunks, the heads, the ... well every inch of her. She may be an amzing ship and I'm proud to have been there but I'm claustraphobic and while I was very impressed I wouldn't want to live aboard.

Someone said they saw my husband and I on the news and in the paper. I didn't get a clipping or see the news but I don't know that I would have wanted to. I don't want anything to change the way that I saw the ship and Billy's family coming together. When those young men and women risk their lives for us, to protect us daily. Yes, I like that I've been given the opportunity to view this so specially.

Semper Paratus!


See you soon.

Barbie~

Monday, November 5, 2012

Harvest Monday 11/05/2012

November Harvest. It's hard to believe, but it's true. This years harvest are a bit different. I'm not as active int he garden.

But, what I am harvesting is typical time wise for Florida.

Roselle is day length sensitive so even if planted early the flowers don't produce calyxes until October and until the first frost. I get the feeling this year will be early for us. It's been unseasonably cool so far already.

While one of my bushes has failed to mature and one died entirely the other has made up for it. Next year I won't actually need to plant them, but I will. Because I want them in the front bed as well. They are invasive if you leave them to their own devices and to me, that's just fine! I love this stuff. It's good in salads, as a tea hot or cold and it's so very good for you! As an added bonus I found out this week that the seeds are VERY good chicken food! *BONUS* 8oz Roselle calyx

Sweet potatoes were harvested this weekend as well. I left one plant in the ground and took out the other 2 (or 3?)

3lbs 3oz Porto Rico sweet potatoes
Yes, they are PINK. Very pink.
Inside right now is light yellow. As they age they would turn to the familiar orange, but I know me and there is about zero chance of that happening. LOL. These are destined to become sweet potato fries with a raspberry sauce. My absolute favorite!

20 eggs also graced my harvest tally this week. Love my girls!

I don't have much else in my garden now just a few lettuce seedlings and beans, and 4 or 5 mustard's. I'm getting ready for a massive overhaul. I couldn't stand the idea of planting it and then tearing it all out again when we brought in new soil. It's made me somewhat depressed about the garden but I know once the new beds (same ones, just taller) are in I'll feel a lot better. Meanwhile I'm concentrating on other projects like the walkway and other things.

Linking in with Daphne's Dandelions for today's Harvest Monday. Better late then never. ;-) Thanks Daphne for always hostessing such a lovely display form around the world!

See you soon!

Barbie~


Thursday, November 1, 2012

Appearances. (Walkway project)

Appearances - Woah. Now that word looks strange after I typed it. Kinda like the word itself wants to tell ya something, huh?
No? Just me? OK, I can deal. ;-)

One of the big projects we've been working on recently has us getting ready for tax season. Eh? Come again? Well. I realize that may sound rather strange, but our driveway is not wide enough for both my itty bitty car and my Honey's big bad truck at the same time. It is wide enough for the two sit there comfortably next to each other, sure. But, you'd better pray no one needs to enter or exit those vehicles!

So we have decided that this coming tax return (Oh, please oh please be there like we planned!) is going to be allotted for a driveway expansion. When we started looking into expanding the driveway we found out that our HOA (TSOAG) have their noses stuck up our butts again and refuse to let us do a circular drive that we have plenty of room for, and in turn also refuse to allow us to pour a CONCRETE driveway in order to continue the uniform look of our existing driveway.

Now, you'd think this would be the preferred method of expanding a driveway so that it would be the most pleasing to the eye and the most likely to be done by a proper contractor under the best conditions. BUT, instead they insist that it can be done by pavers, or other such nonsense. Being that we planned on putting a facade of stack stone on the front of the house around the garage this goes against every bit of eye pleasing/decorating sensibility that I have. I REALLY wanted to have concrete poured and have it stamped all the way across the driveway to be uniform. GRRRR.... Instead I'll have pavers, stone on the small retaining wall around the planters and a different stone on the wall of the house. *CRINGE* I'm hating this!

I digress. Since there will be so many types of stone involved we decided to get started early on one part of the project. The only part that we felt comfortable tackling by ourselves and before any of the tax return came in. Stack stone can get expensive and this portion was not nearly as expensive. So we dove in, head first. It took a few weeks of looking around and a whole lot of arguing over exactly what pavers we were going to use. (I like to tans and browns and hubby liked the more mixed pinks and blues) We found some instead that had the slate colors he liked with the browns that I liked and mixed them with the pinks that we already had (that I hate, they are on our pool deck)

Then, we got to work laying them on our sidewalk up to our front door.


Well, it's not perfect for either of us. I suppose it keeps both of us from gloating and we are both equally satisfied that the job is done. We used only the 4" square blocks on the walkway but the driveway expansion that will abut the walkway will use both the larger rectangular bricks and the smaller squares in the pattern. This should distinguish the walkway from the driveway and meanwhile we have a much nicer looking entrance for the next 6 months while we wait to start and finish construction on the other projects. I might attempt the stack stone, but I certainly can not handle the driveway expansion.

I've laid a lot of patios and walkways, like I did this one but something for a (real) vehicle to drive on? No way! Not to mentions the HOA (TSOAG) would certainly be sending me some love letters after that. LOL. At a hundred dollars a day fines I think I'll skip. Thanks anyway.

More projects posting soon, because I've been a very busy gal!


See you soon!

Barbie~

*TSOAG= The Sons Of A Guns*